Chapter 2: Why Desktop First
Iterate on the desktop, verify on the device
There is a particular kind of afternoon that mobile game developers know well. You change one number — a jump height, a spawn rate, the easing on a menu — and then you wait. The APK builds. It uploads. The app launches. You navigate three screens to get back to the thing you were looking at. You decide the number is still wrong. You change it again. By four o'clock you have tried nine values and lost the thread of what you were trying to achieve.
The fix is not a faster laptop. The fix is to stop putting a device in the middle of a loop that does not need one. Almost everything you get wrong while writing a game — a rule, an ordering, an off-by-one in a grid, a state that cannot be reached — is wrong in exactly the same way on a desktop as it is on a phone, and a desktop tells you so in three seconds instead of forty-five.
That is the argument of this chapter, and it comes with a matching warning, because the argument is very easy to over-apply. A desktop build is not the product. There is a specific, short, knowable list of things it will lie to you about — touch feel, thermals, safe areas, packaging — and those things have to be checked on hardware before you ship. This chapter is about knowing which list a given question belongs to, and structuring your project so that answering it is cheap.
What you will learn in this chapter
- Why the edit-to-run cycle, not raw build time, is the number that decides how good your game feels.
- How to add a DesktopGL head to the four-project layout from Chapter 1 without disturbing it.
- Exactly which questions a desktop build answers honestly, and which it cannot answer at all.
- How the mouse-as-touch fallback in
ChapterGamelets the same scene code run under a mouse and under a finger. - Why
IsFixedTimeStepand vsync behave differently on desktop and device, and what that does to your timing assumptions. - A workflow for deciding, in a few seconds, whether a change needs a device run before you trust it.
- The caveats: input feel, GPU capability, memory pressure, and the failure modes that only exist on real hardware.
The code for this chapter
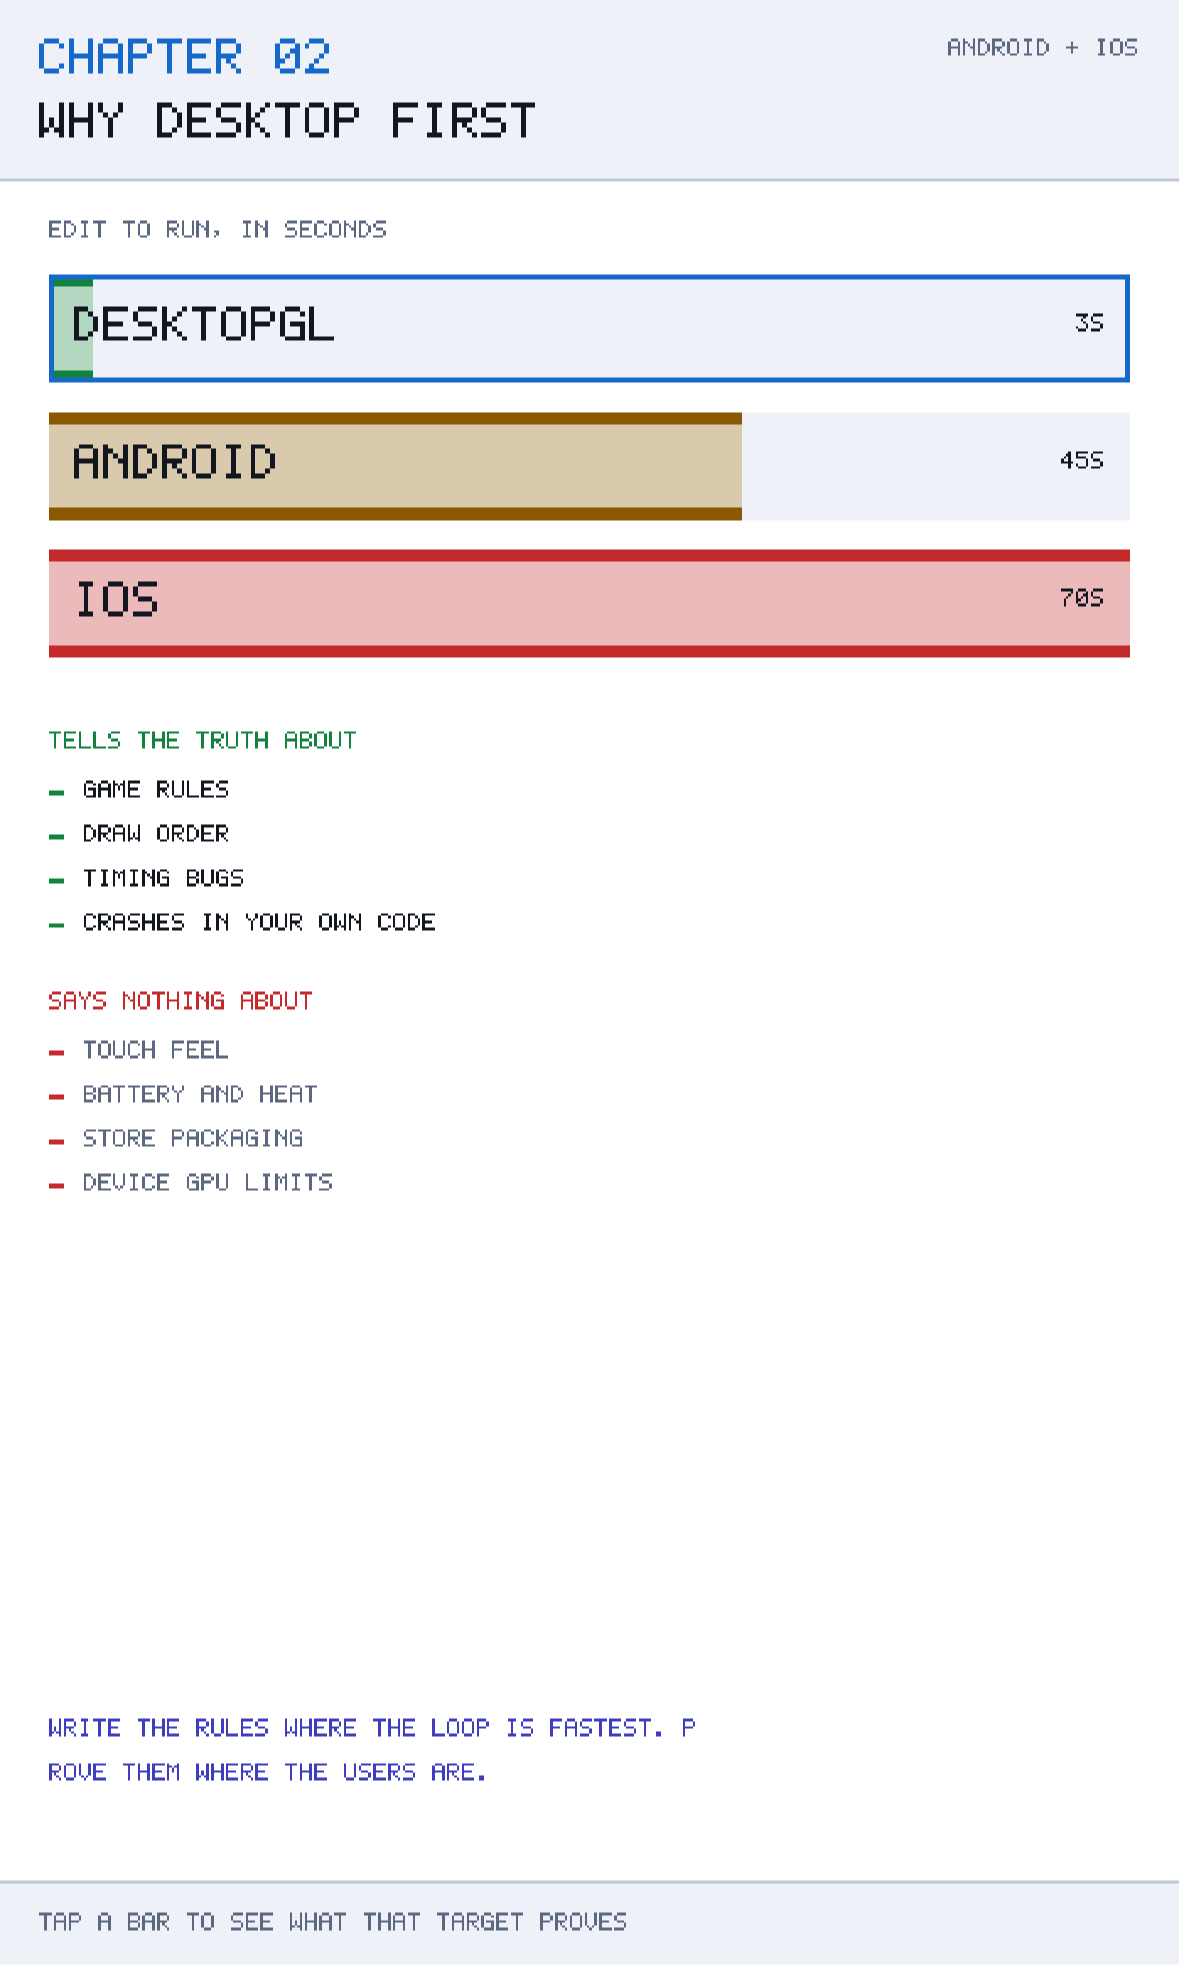
The running demonstration is at github.com/nodoid/MonoGameBook/src/Chapter02. It draws three bars — one per build target — sized by how long that target's edit-to-run cycle takes, and lists what each target can and cannot tell you the truth about.
As with every chapter, the rules live in Core and the drawing lives in Shared. The rules here are a single record and a list:
public sealed record PlatformProfile(
    string Name,
    int EditToRunSeconds,
    string[] TruthfulAbout,
    string[] BlindTo);
Four fields, and the two that matter are the last two. A build target is not "good" or "bad"; it is honest about some things and blind to others, and the skill being taught here is knowing which is which.
The number that actually matters
Developers talk about build times. Build time is the wrong number. The number that governs how good your game feels is the edit-to-run cycle: the wall-clock time from saving a source file to seeing the consequence of that change on screen, in the state you care about.
On a desktop head, that is roughly:
| Step | Desktop | Android device | iOS device |
|---|---|---|---|
| Compile | 1–2 s | 3–5 s | 3–5 s |
| Package | — | 8–15 s | 10–20 s |
| Deploy | — | 10–20 s | 15–35 s |
| Launch to first frame | 1 s | 3–6 s | 3–8 s |
| Navigate back to the state under test | 0–5 s | 5–15 s | 5–15 s |
| Typical total | ~3 s | ~45 s | ~70 s |
The chapter's Core encodes exactly those three totals, and the demonstration turns them into bars. It also computes the ratio that makes the point:
/// <summary>How many desktop iterations fit in the time one device run takes.</summary>
public static int IterationsPerDeviceRun(PlatformProfile device) =>
    device.EditToRunSeconds / Profiles[0].EditToRunSeconds;
Fifteen desktop runs fit inside one Android run. Twenty-three fit inside one iOS run. That is not a small optimisation; it is the difference between exploring a design and guessing at it.
There is a second, less obvious cost to the long loop. A forty-five second wait is long enough to check email, and once you have checked email you have lost the mental model of what you changed and why. Short loops keep the whole problem in your head. That is worth more than the seconds.
Adding a DesktopGL head
The layout from Chapter 1 was built for exactly this. Core has no MonoGame reference, Shared is a folder of linked sources, and the heads are thin. Adding a third head is four files' worth of work and disturbs nothing.
Create Desktop/Chapter.Desktop.csproj alongside the other heads:
<Project Sdk="Microsoft.NET.Sdk">

  <PropertyGroup>
    <TargetFramework>net10.0</TargetFramework>
    <OutputType>WinExe</OutputType>
    <RootNamespace>MonoGameBook</RootNamespace>
    <Nullable>enable</Nullable>
    <ImplicitUsings>enable</ImplicitUsings>
  </PropertyGroup>

  <ItemGroup>
    <PackageReference Include="MonoGame.Framework.DesktopGL"
                      Version="3.8.5.1" />
    <ProjectReference Include="..\Core\Chapter.Core.csproj" />
  </ItemGroup>

  <ItemGroup>
    <!-- Exactly the same glob the mobile heads use. -->
    <Compile Include="..\Shared\*.cs" LinkBase="Shared" />
  </ItemGroup>

</Project>
Note the TargetFramework: plain net10.0. MonoGame.Framework.DesktopGL is the third of the three assemblies discussed in Chapter 1, and like the other two it cannot share a library with them — but it can be the target of the same Compile Include glob, because source sharing does not care.
The entry point is the shortest of the three:
using var game = new ChapterGame();
game.Run();
That is the whole Program.cs. Top-level statements, one using declaration so the game is disposed on exit, and Run() — which on desktop genuinely blocks until the window closes, unlike the iOS case in Chapter 1.
One adjustment is usually worth making. ChapterGame asks for a full-screen game because that is what a phone is:
graphics = new GraphicsDeviceManager(this)
{
    IsFullScreen = true,
    SupportedOrientations =
        DisplayOrientation.Portrait | DisplayOrientation.PortraitDown,
    PreferredBackBufferWidth = Renderer.DesignWidth,
    PreferredBackBufferHeight = Renderer.DesignHeight,
};
On desktop you want a window, at a phone-shaped aspect ratio, that you can put next to your editor. Because IsFullScreen is only meaningful on desktop, this is one of the very few places a platform check earns its keep:
#if !ANDROID && !IOS
graphics.IsFullScreen = false;
graphics.PreferredBackBufferWidth  = Renderer.DesignWidth;
graphics.PreferredBackBufferHeight = Renderer.DesignHeight;
Window.AllowUserResizing = true;
#endif
Keep the aspect ratio honest
Size the desktop window to the same aspect ratio as your design space — 480 × 800 here, so 3:5. If you debug in a 16:9 window you will unconsciously lay out for 16:9, and every screen will need rework the first time you see it on a phone. Chapter 5's virtual resolution makes this cheap to get right.
Mouse as a finger
A scene written for touch has to be drivable with a mouse, or the desktop head is useless. The book's host handles that in one place, so no scene ever has to think about it. ChapterGame.GatherInput reads the touch panel first, and only falls back to the mouse when there are no touches at all:
MouseState mouse = Mouse.GetState();
if (touches.Count == 0 &&
    (mouse.LeftButton == ButtonState.Pressed ||
     previousMouse.LeftButton == ButtonState.Pressed))
{
    Vector2 position = target.ToDesign(new Vector2(mouse.X, mouse.Y));
    Vector2 previousPosition =
        target.ToDesign(new Vector2(previousMouse.X, previousMouse.Y));

    bool pressed = mouse.LeftButton == ButtonState.Pressed &&
                   previousMouse.LeftButton == ButtonState.Released;
    bool released = mouse.LeftButton == ButtonState.Released &&
                    previousMouse.LeftButton == ButtonState.Pressed;

    if (!released)
        touch.Add(new Finger(-1, position,
                             position - previousPosition, pressed, false));
    else
        touch.Add(new Finger(-1, position, Vector2.Zero, false, true));
}

previousMouse = mouse;
Three decisions in that block are worth copying into your own games.
The mouse is only consulted when there are no touches. On a Windows tablet or a touchscreen laptop both are live at once, and a synthesised mouse event chasing a real finger produces a phantom second contact. Touch wins.
The synthetic finger has id `-1`. Real touch ids are non-negative, so a scene that tracks fingers by id can always tell a mouse apart from a finger if it needs to. Most scenes do not need to, which is the point.
The `Released` frame carries no delta. When a button goes up, the position is where it was released, and reporting movement on that frame makes flick and swipe detection jittery. Chapter 6 relies on this when it computes swipe velocity.
The conversion through target.ToDesign(...) is the other half of the trick: mouse coordinates arrive in back-buffer pixels, and every scene works in the fixed 480 × 800 design space, so the renderer maps between them. That is Chapter 5's subject, and it is what lets the same tap-target arithmetic be correct in a resizable desktop window and on a notched phone.
What the desktop tells the truth about
Run the demonstration and tap the first bar. The green list is the honest one.
Game rules
Scoring, wave progression, the legality of a Sudoku move, whether a state machine can reach a dead end: all of these live in Core, none of them touch the GPU, and every one of them behaves identically on every target. If a rule is wrong, it is wrong on desktop, and you will find out in three seconds.
Draw order and layout arithmetic
Whether the HUD is drawn over the playfield, whether a panel's border is one pixel out, whether text is clipped by a card: these are pure arithmetic against the design space. They are the same everywhere.
Timing bugs in your own code
Accumulators that drift, timers that reset on the wrong frame, animations that jump when the frame rate changes — Chapter 4's subject — all reproduce on desktop, and reproduce more readily there, because you can inject an artificial stall without holding a phone under a hairdryer.
Crashes in your own code
Null references, index-out-of-range, disposed textures. The stack trace in your IDE is attached in milliseconds; attaching a debugger to a device is a chore by comparison.
What the desktop cannot tell you
Tap the second or third bar and read the red list. These are not edge cases; each of them has sunk a real release.
Touch feel
This is the big one. A mouse is precise, has hover, and never obscures the screen. A thumb is nine millimetres wide, arrives with the palm attached, and covers the thing it is pressing. A drag-to-move control that feels responsive with a mouse can feel like the ship is glued to your finger on glass — which is exactly the problem Chapter 8 exists to solve. No amount of desktop testing substitutes for putting the build on a phone and using it with one hand while standing up.
Battery, heat and sustained frame rate
Desktop machines have fans. A phone does not, and after eight minutes of a particle-heavy scene it will quietly halve its GPU clock. A game that runs at a solid 60 on your laptop and on the phone for thirty seconds can still be a stuttering 30 by the time a player reaches level three. Chapter 22 measures this properly.
Safe areas, notches and gestures
The iPhone's home indicator sits over the bottom of your screen. Android's gesture bar does the same. A button placed twenty pixels from the bottom edge is fine on desktop, unreachable on hardware, and the only way to know is to look.
Store packaging and signing
Nothing about the desktop build exercises an AAB, a provisioning profile, an entitlements file or an App Store privacy declaration. Chapters 23, 24 and 25 are entirely about things a desktop build cannot see.
GPU limits and driver behaviour
Texture size caps, precision in shaders, the number of texture units, whether a particular blend state is supported: mobile GPUs are less forgiving than desktop ones, and the failures are often silent rather than loud. A shader that quietly produces black on one Android driver will look perfect in your DesktopGL window.
A useful rule of thumb: if the question can be answered by reading a number, the desktop can answer it. If the question is "how does this feel?" or "does this survive ten minutes?", only hardware can.
A workflow that uses both
The practical shape of a day's work looks like this.
- Write the rule in
Core, with the desktop head running. Iterate until the numbers are right. - Wire the rule into the scene in
Shared, still on desktop. Iterate until the layout is right. - Deploy to one Android device and one iPhone. Use the feature with your thumbs, standing up, for two minutes.
- Fix whatever that revealed — nearly always a hit-target size, a gesture threshold, or something under the home indicator.
- Once a day, run the full build for both heads so you find platform breakage within hours rather than weeks.
The repository has a script for the last step:
./build-all.sh            # both platforms, every chapter
./build-all.sh ios        # one platform
./build-all.sh android 07 12 19
The point of running it daily rather than at release is Chapter 1's caveat made concrete: the dependency rule is a convention, and linked-source projects only tell you a file broke the other head when the other head is built.
Caveats
Do not let the desktop head become a target
A DesktopGL head that starts as a debugging tool can quietly acquire a keyboard control scheme, a windowed menu, and a settings screen — and now you are shipping two games. Keep it deliberately unfinished. In this book the desktop head is not even committed for most chapters; the mouse fallback in ChapterGame is the only concession made to it.
Frame pacing is genuinely different
MonoGame's default IsFixedTimeStep = true with a 60 Hz target behaves differently against a desktop compositor than it does against a mobile display link. On desktop you may get vsync at 60, 120 or 144 depending on the monitor; on iOS the CADisplayLink runs at the display's refresh rate, which on a ProMotion device varies from 10 to 120 Hz while your game is running. Any logic that assumes a fixed ElapsedGameTime is a bug waiting for a 120 Hz phone. Chapter 4 covers the accumulator that makes this safe.
The simulator is not a device either
The iOS Simulator is closer to a device than a desktop window, but it runs on your Mac's CPU and GPU. It is honest about layout, safe areas and UIKit behaviour, and dishonest about performance and about anything touching the camera, sensors or GPU limits. Treat it as a fast desktop build with correct screen metrics.
Emulators and Android fragmentation
An Android emulator running a recent system image tells you very little about the four-year-old mid-range device that half your users have. If you can afford exactly one test device, buy a cheap one — the expensive phone will run anything.
Building and running this chapter
The solution is src/Chapter02/Chapter02.sln in the book's repository at github.com/nodoid/MonoGameBook/src/Chapter02. It builds and runs entirely on its own; nothing in it depends on any other chapter having been read or built.
Build either head from the chapter folder:
cd src/Chapter02
dotnet build Android/Chapter.Android.csproj
dotnet build iOS/Chapter.iOS.csproj
To deploy to a connected Android device or a running emulator:
dotnet build Android/Chapter.Android.csproj -t:RunTo run on the iOS Simulator without opening an IDE, build for the simulator runtime and install the bundle by hand:
dotnet build iOS/Chapter.iOS.csproj -p:RuntimeIdentifier=iossimulator-arm64
xcrun simctl install booted \
  iOS/bin/Debug/net10.0-ios/iossimulator-arm64/Chapter02.iOS.app
xcrun simctl launch booted com.monogamebook.chapter02
Everything the chapter demonstrates is reachable by touch on the first screen; there are no menus to navigate and nothing to load.
Try it yourself
- Add the DesktopGL head described above to
src/Chapter02, and run it. Compare the wall-clock edit-to-run time againstdotnet build Android/Chapter.Android.csproj -t:Runon a real device. - Change the desktop window to 16:9 and look at how wrong the letterboxed layout feels. Change it back.
- Edit the numbers in
PlatformComparison.Profilesto match the times you actually measured on your own machine and device, then rerun the chapter app. - Add a fourth
PlatformProfilefor the iOS Simulator, and decide honestly which of its claims belong inTruthfulAboutand which inBlindTo.
Summary
This chapter argued for a workflow rather than a feature. The edit-to-run cycle is the number that decides how much of a design you get to explore, and a desktop head shortens it by a factor of roughly fifteen against Android and twenty-three against iOS. Because the layout in Chapter 1 shares source rather than compiled code, adding that head costs one project file and two lines of Program.cs, and it disturbs nothing else.
The corresponding discipline is knowing what the fast loop cannot see. Rules, draw order, layout arithmetic and your own crashes are the same everywhere. Touch feel, sustained frame rate under thermal load, safe areas, GPU limits and store packaging are not, and each of those has a chapter of its own later in this book precisely because they cannot be shortcut.
The one-line version is the line the demonstration app pulses at the bottom of the screen: write the rules where the loop is fastest, prove them where the users are.
Chapter 3 continues in the same practical direction by looking at how assets get from your disk into a running mobile game — the content pipeline, what it actually does to a file, and the one case in this book where we deliberately go around it.